Read time: about 15 minutes
Designing a Track Plan for your Model Railroad can be a daunting task, especially with the myriad of over-complicated designs on the internet and misconceptions perpetuated within the hobby by others. But here at Model Railway Techniques we’re going to show you How to Design a Track Plan and share with you some valuable insight into making the Track Planning process both easy and understandable.
We will give you a step by step illustrated guide on how to draw a scale Model Railroad Track Plan beginning with an overview of some design basics such as location and shape, era, types of trains you want to run on your layout, and some brief operational and scenic ideas to consider.
You don’t require special design software or computer skills as many suggest, and you don’t have to be an expert draftsman to design and create a scale drawing for your own Model Railroad. It doesn’t matter if you are a beginning Model Railroader, or more advanced, the techniques and tips shared below will help you to design and create your own Model Railroad with ease.
This site uses affiliate marketing links. I may earn commission on purchases made through links on this site at no additional cost to you as a consumer. For example, As an Amazon Associate, I earn from qualifying purchases made through this site if you click on a link and make a purchase. These earnings help to provide resources to make our site content better, up to date, and provide our users with a better experience. I appreciate your support, thank you.
- DECIDING ON AN OVERALL LAYOUT SHAPE AND OPERATING DESIGN FOR YOUR MODEL RAILROAD
- PUTTING YOUR IDEA ON PAPER
- DRAWING A SCALE PLAN FOR YOUR MODEL RAILROAD
DECIDING ON AN OVERALL LAYOUT SHAPE AND OPERATING DESIGN FOR YOUR MODEL RAILROAD
One of the very first things you should do when you are considering starting a design for your Model Railroad is to decide on the general shape of your layout, and how this will tie into your Operating Design, or Theme. We’ve covered at length the basic design ideas and layout shapes in an earlier article, DESIGNING YOUR MODEL RAILROAD: BASIC DESIGN IDEAS FOR THE SMALL TO MEDIUM SIZED MODEL RAILROAD, I highly recommend you read this if you haven’t already done so. In the article we go over the basics of where to locate your Model Railroad, the different shapes or basic configurations, and some details on important considerations for you to think about.
As you are considering on where you want to build your Model Railroad, you should also be thinking about your Operating Design or Theme, since both of these factors will have a major impact on helping you develop a track plan for your Model Railroad based on your wants and desires. You can get more information about that in our article, CHOOSING A THEME FOR YOUR MODEL RAILROAD – Model Railway Techniques.
It is more advisable to design your own Model Railroad Track Plan rather than choosing a generic plan off the internet or someplace else and trying to adapt it to your needs. This is one mistake Model Railroaders make time and time again, which leads to dissatisfaction with the track plan as the Model Railroad progresses. You should be asking yourself these key questions as you think about your Model Railroad Track Plan:
- WHAT ERA OR TIME FRAME INTERESTS ME?
- DO I LIKE FREIGHT OR PASSENGER TRAINS?
- DO I WANT TO INCLUDE LOTS OF INDUSTRIES FOR SWITCHING, OR CONCENTRATE ON SCENIC VIEWS?
- DO I WANT SINGLE, DOUBLE, OR MULTIPLE TRACK?
- DO I WANT A YARD OR LOCOMOTIVE SERVICE FACIITIES?
- AM I LOOKING FOR REALISM?
ERA
The era you decide on can have a big impact on your Model Railroad design. Older time periods had smaller and shorter locomotives and equipment, as did logging, narrow gauge, or mining railroads. As you progress towards more modern times the locomotives and equipment get much larger.
The minimum and maximum radius of your Model Railroad, determined by your smallest turn-back curve, will affect not only the operating reliability of your Model Railroad, but also the appearance of the trains themselves on it, and are directly related to the era of your Model Railroad.
FREIGHT VS. PASSENGER
Your taste on freight or passenger trains also has an effect on your track plan. Generally, passenger equipment is longer than freight equipment and as such will require a larger curve radius, although many modern freight cars such as intermodal and stack trains exceed passenger car lengths. Once again it comes down to both reliable operation and appearance.
INDUSTRIES VS. SCENERY
If your preference is more into switching activities, then naturally you will want to include a variety of industries to switch your freight cars in and out of. Switching spurs, runarounds, and industries can take up quite a bit of space, and a well thought out track plan will pay off for you here.
And if you are planning a moderately sized Model Railroad then you would naturally want to space these out a bit, representing different towns or cities, or have one or two sprawling industrial districts. Factoring in scenery will take a bit of careful planning also.
Perhaps impressive scenery with trains rolling through them is your goal. In this case, the amount of trackwork in any given area needs to be reduced to allow for the proper effect you are after, and you should try to design your track plan with sweeping curves to really maximize the effect of your scenery.
SINGLE VS. MULTIPLE TRACK
Single track is mostly for those that want to model a short line or similar railroad leaning towards operations. It requires passing tracks so two trains can either meet each other and pass, or allow a faster train to overtake a slower one. On a small Model Railroad this may not be the best choice since you will find yourself constantly stopping your trains for this.
Double track, on the other hand, can allow two or more trains to operate continuously, and can be treated like single track also. The amount of extra space required is almost negligible, but the operating benefits can be huge, so it is a pretty good choice for the smaller Model Railroad.
Mutli-tracks of three or more are usually for the Model Railroader that just loves to watch their trains run and may or may not be based on real locations. The famous Horseshoe Curve is a prime example of this, with its four tracks laid out in a spectacular half circle turn back curve.
YARD AND SERVICE FACILITIES
If you want to include a yard or locomotive service facility on your Model Railroad, then you will need a suitable long section on your Model Railroad for this. Railroad Yards as usually envisioned are huge complexes of multiple tracks consisting of arrival/departure tracks, classification tracks, and other trackwork. There are some smaller examples that are well suited for Model Railroads, and I model such a yard on my own Model Railroad as seen in our header image on our home page.
Locomotive service facilities can be equally as massive, and most Model Railroaders think of a Roundhouse or Diesel Service Area. Roundhouses will take quite a bit of room on your Model Railroad, but Diesel Service Areas can be compressed down to two or three tracks. The decision comes down to just how much space you are willing to give to model these elements on your Model Railroad.
REALISM
And that brings us to our last question, how much realism are you looking for? While it is impossible for the average Model Railroader to model a faithful true-to-scale representation of a real railroad, it is possible, with some careful considerations, to accurately portray real railroading on your Model Railroad.
This would encompass taking all of the considerations above and deciding what you will and won’t include on your Model Railroad. If ultimate realism is your goal, then you must design your Model Railroad with these goals in mind.
It also includes an adequate minimum radius for your chosen era so your equipment looks right, carefully including key elements and proportioning them properly, and allowing enough room for scenery to tie everything together in a realistic manner.
If you aren’t particularly interested in realism, then you can just add whatever you desire. There is an old saying in this hobby, “It’s your railroad, do what you want” I back this idea 100%, since, after all, the hobby is meant for your enjoyment, and that is all that matters.
PUTTING YOUR IDEA ON PAPER
Now that you have decided on where to build your Model Railroad, and you have decided on a general theme and which elements to include, it’s time to put those ideas onto paper.
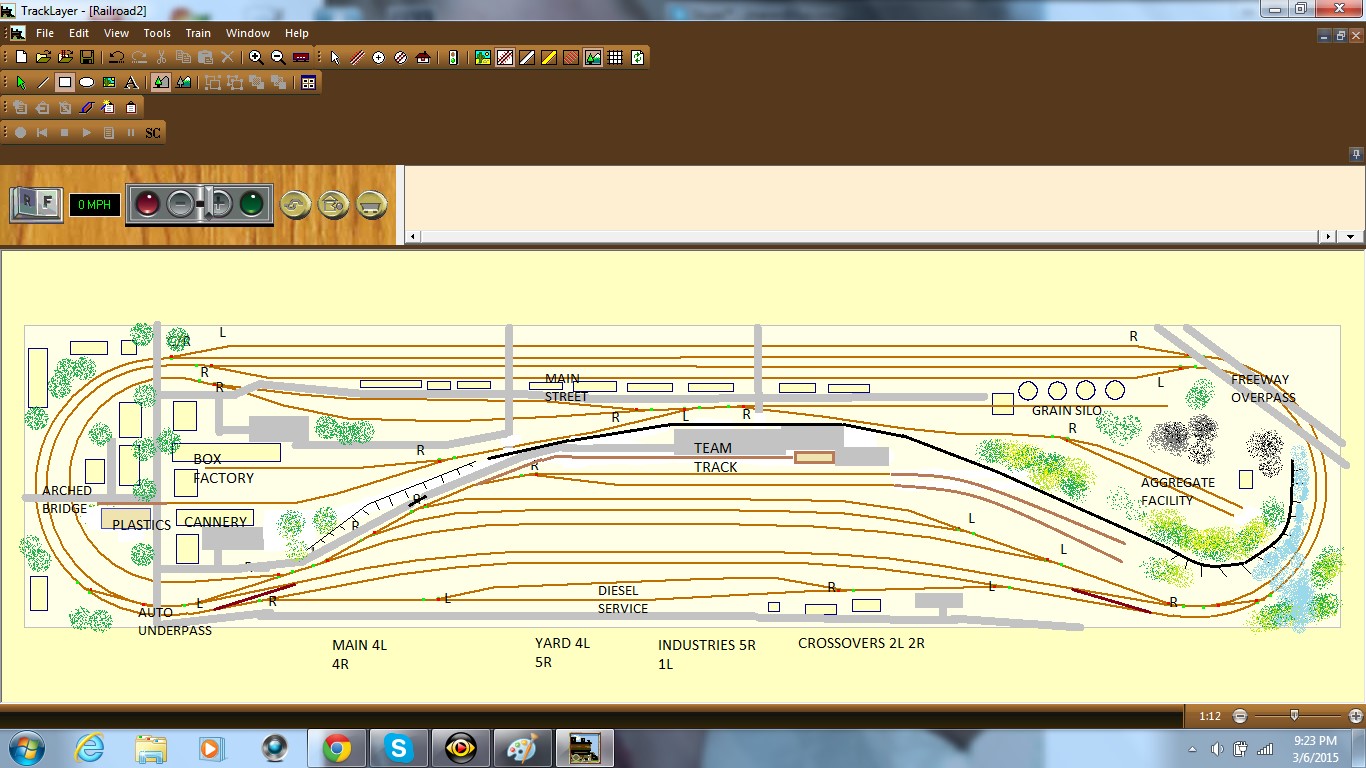
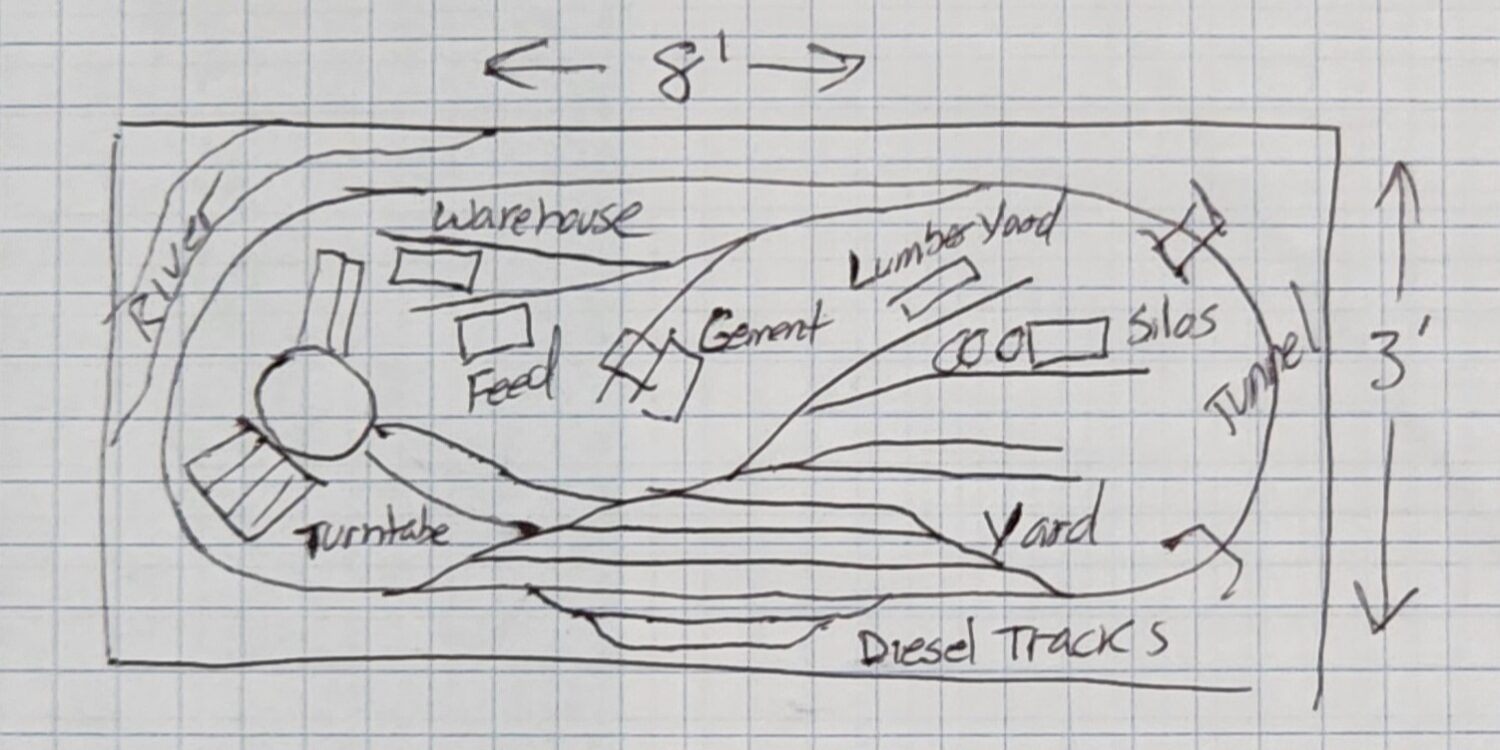
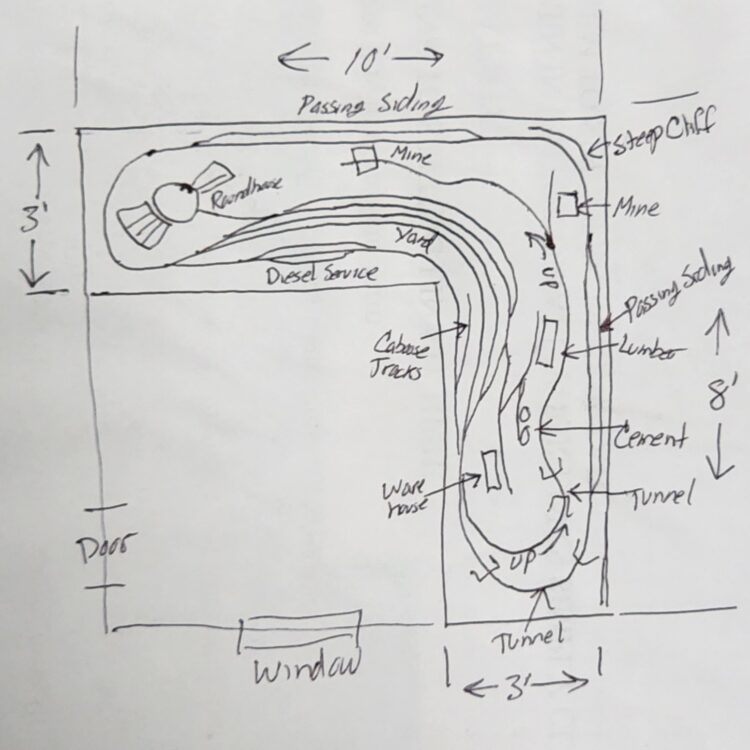
You can start with a rough sketch of your area and the shape of your layout as seen in the two examples below. These are purposely drawn the way most Model Railroaders perceive will fit in an area, and as you can see there is a lot going on in both sketches.
There is nothing wrong with this, I have drawn up literally dozens of similar rough sketches as I designed and built my different Model Railroads over the years. Remember, it’s just a rough idea, and the detailed steps that follow on actually taking your sketch from a rough idea to drawing your Model Railroad to scale will refine your ideas and often times bring new ones to light that you hadn’t thought of.
DRAWING A SCALE PLAN FOR YOUR MODEL RAILROAD
You’ve decided on your theme, you have an area and general idea for your Model Railroad, now all that’s left to do is start drawing your idea to scale. This process will give you a definitive idea of what will actually fit based off of your rough sketch ideas as shown in the two examples above.
Below is the detailed step-by-step process of drawing your plan to scale along with illustrations. For this you will require the items in the photo below which include a Pencil, a 12″ Ruler, a 6″ Ruler, a Drawing Compass, and optional, a Protractor. You can find these items at any office supply store or purchase them from Amazon. You will also need some Graph Paper, 4 Squares per Inch. If you are unfamiliar with the use of a Drawing Compass, we have a short five-minute tutorial, DRAWING A SCALE TRACK PLAN-HOW TO USE A COMPASS, that you can check out real quick and then return back here.

Note: For illustrative purposes each step will be indicated by the addition of the red track lines and shaded and/or colored elements as they are added to each drawing. As you draw your plan, use pencil so you can erase lines if needed.
The drawing represents a typical 3’x8′ N Scale Model Railroad. Where actual reference is not made regarding the larger scales, doubling (for HO Scale) or tripling (for O Scale) the dimension will give you more than adequate clearances. You can also check out our Reference category for more information.
DRAWING SCALE DEFINED
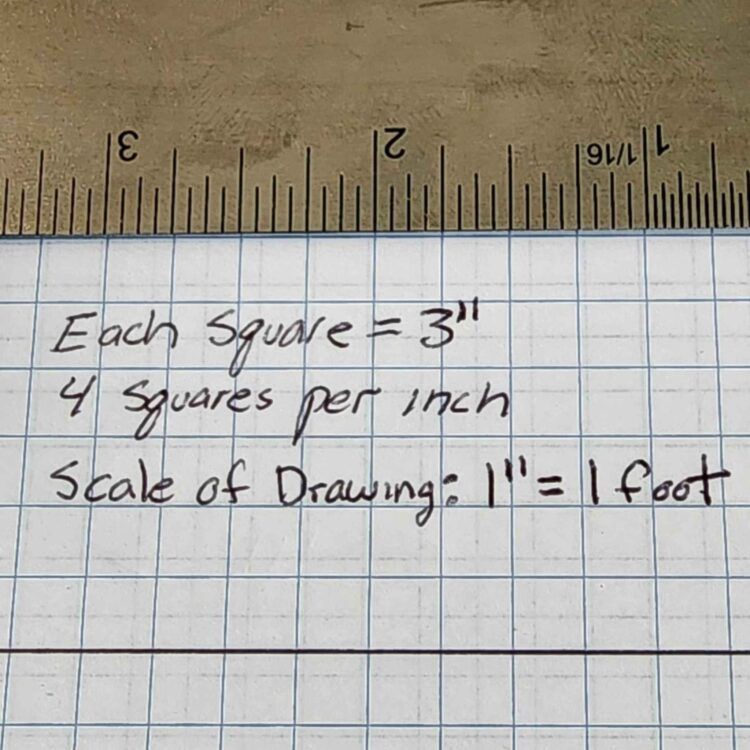
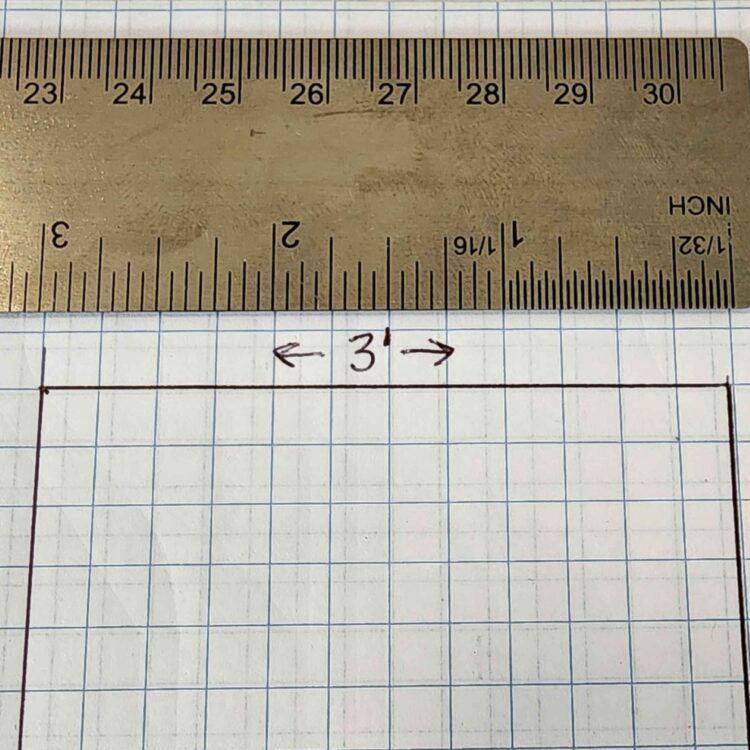
The drawing scale is set at 1″= 1 foot. This is a convenient scale when using graph paper since each square will equal 3″, which is a common useful measurement to quickly provide clearances and draw turnouts accurately. It also allows quick overall dimensions with your ruler since every inch basically represents a foot. On standard size paper you can draw an overall plan of up to 8’x11′. You can tape several pieces together for larger plans, or you could draw sections of your layout at a time in the dimensions of your benchwork.
This is a particularly useful method when you study the drawings in our article DESIGNING YOUR MODEL RAILROAD: BASIC DESIGN IDEAS FOR THE SMALL TO MEDIUM SIZED MODEL RAILROAD, since the basic shapes are all based off of sectional pieces of benchwork you can build yourself as described in our article HOW TO BUILD AFFORDABLE MODEL RAILROAD BENCHWORK-OPEN GRID METHOD. Model Railway Techniques also offers high quality Model Railroad Benchwork Kits at prices far lower than any other manufacturers, so you may want to explore that option also.
STEP 1: DRAWING THE MAINLINE(S)

The first step is to draw your mainline curves using your compass and connect them all together using your ruler. It is important to leave room for scenery along the edges of your layout, which also acts as a safety margin for your trains so they won’t accidentally fall to the floor and get damaged. Don’t be tempted to decrease this dimension, a common mistake made by many. For N Scale we recommend 3″, for HO Scale 6″, and O scale 12″
Your curves are determined by the largest radius that will fit inside your benchwork while allowing for the edge clearances above. In this case it is 15″ (36″-6″=30″) (half of that is 15″) You can count the squares, which equal 3″, to see how this works. The track centerline spacing shown for the double track is 1-1/2″ or half a square. Convenient right?
STEP 2: ADDING YOUR INDUSTRY SIDINGS
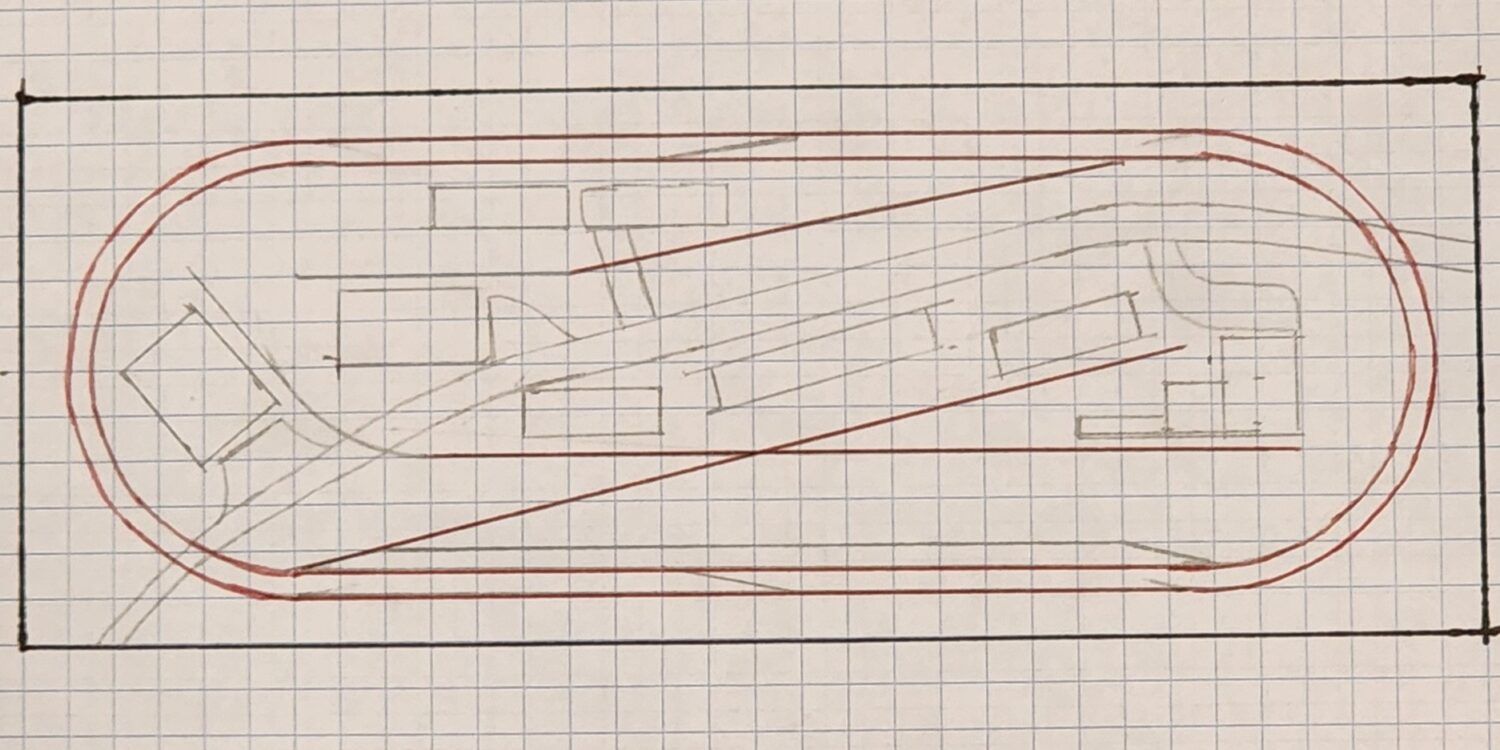
Step 2 is drawing in your turnouts for your industry sidings using the turnout number guideline below. For N Scale allow 6″, or two squares in this case, for the length of your turnouts, and half a square, or 1-1/2″ for the angle. (the track centerline spacing) This will work for turnouts up to about a #8. Allow one additional square, or 9″ for #10’s and #12’s. Double these dimensions for HO Scale and triple them for O Scale. For now, the spur tracks can be just straight lines, you will add gentle curves if desired in the next step.
Aside from the minimum radius, the turnout length is the single most important measurement to not skimp on when drawing your scale track plan because it has a dramatic effect on what will fit, especially when it comes to designing yard tracks and passing sidings. Far too often Model Railroaders think they can have a long yard or passing siding, only to find out that when they actually start laying track it is much shorter than anticipated. It is far better to learn this on paper, rather than when you are laying track and have to pull up sections and redesign.
TURNOUT NUMBERS DEFINED

Turnouts are identified by a number which defines how sharply they diverge from a straight section of track. It is a simple ratio, and the numbers apply to every scale. For example, the #4 turnout above angles out 1 unit for every 4 units of length, #6 angles out 1 unit for every 6 units of length and so on. Note that the use of the graph paper in the above example is only to visually illustrate the point and has no correlation to the scale of the track plan in the example.
Deciding which turnout number to use is determined by your longest equipment, and generally you want to use the largest number possible for both appearance and reliability. In N Scale I use #5’s for my yard and spur tracks, and #7’s for the mainline. With 6 axle diesels and 50′ car lengths I have zero problems. The few autoracks that I have work on those also. The #4 turnouts should only be used on industrial sidings since they can cause operational problems if used in yards and on mainlines.
STEP 3: ADDING CROSSOVERS AND CURVES TO YOUR SPUR TRACKS

Step 3 is adding any crossovers where desired to create passing tracks and adding gentle curves to your spur tracks for visual appeal. In the example above we’ve added two crossovers at the top and bottom of the illustration, and a curve to the spur track on the left. We also added a passing siding at the bottom.
Note how the crossovers use three squares of length, indicating a larger turnout number. Also note how they are opposite of each other. This arrangement creates two passing sidings, one on each loop. When adding crossovers to a double-track mainline, you need to allow your train to switch from one mainline, then back to the original mainline. If your crossovers are not opposite each other, your train will be trapped on one loop. For this reason, they should always be added in pairs.
STEP 4: ADDING STRUCTURES AND BUILDINGS
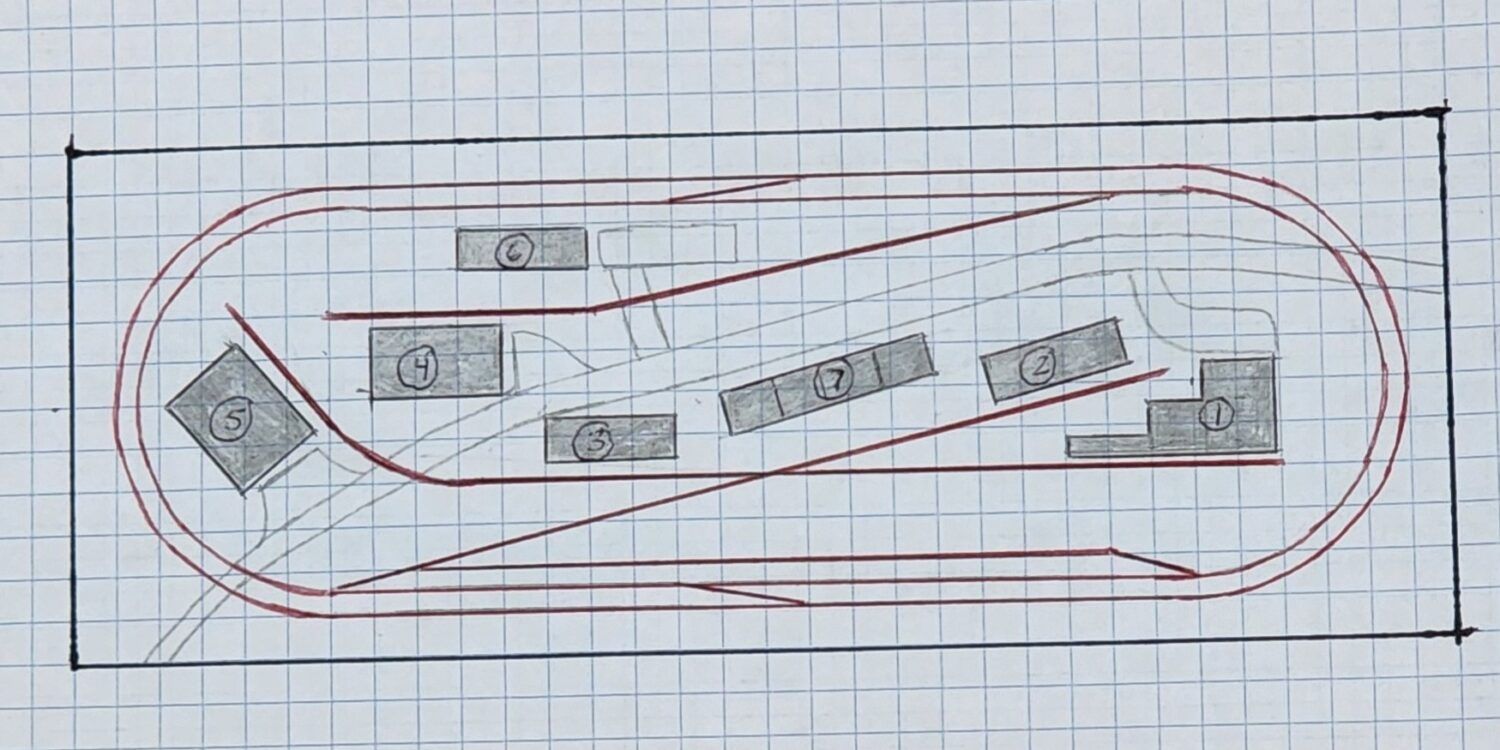
Step 4 is drawing in your industries and other structures you may want to incorporate into your Model Railroad. Using your grid as a measurement reference, or your ruler, draw these in with generous proportions. We’ve shown the smaller industries as 9″ long, enough for two boxcars, and 3″ wide, which is pretty typical of most N Scale building kits in a rectangular shape.
Many manufacturers of kits list the dimensions in their product descriptions, and they are almost always on the box. You can gather this information beforehand to aid you in creating your scale track plan for your Model Railroad. This is another important area not to skimp on dimensions. There’s nothing worse than finding out the building you just bought won’t fit where you want it because there is not enough room between the tracks for it. Also, don’t crowd them too tightly as you’ll find out in the next step.
STEP 5: ADDING ROADS AND PARKING
Step 5 is adding in roadways and parking area on your scale track plan. Your Model Railroad people and vehicles need some logical way of accessing your industries or buildings. This is another element often overlooked in the rush to get track laid and trains running on your Model Railroad. Trying to work this in around crowded trackwork, or structures can be very frustrating when done after the fact.
They don’t necessarily have to connect to a main roadway as we’ve shown, they can be just as effective coming from the edge of the layout to an industry or two. We were recreating the typical small railroad town look of a Main Street with smaller roads branching off to the various industries in town. A good rule of thumb is to allow 3″ of width for a main two-lane street, and 2″ for a small two-lane roadway. Also, don’t forget to add parking or truck unloading areas, as these are vitally as important.
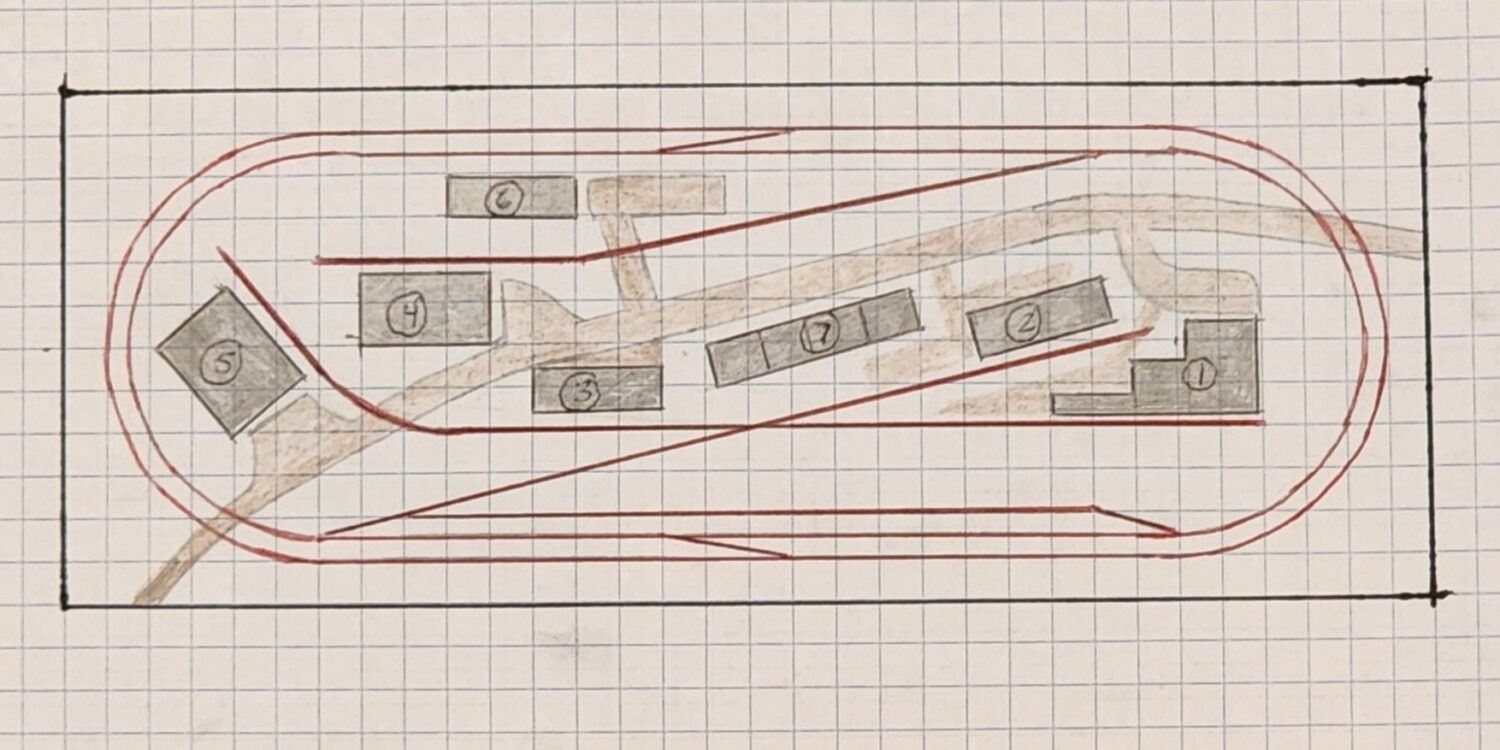
STEP 6: BASIC TERRAIN AND SCENERY

Step 6 is adding some basic scenic landforms and scenery items. By this point in your Model Railroad planning and design process you should already have a general idea of how you want your scenery to look. Now is the time to add in your hills or mountains, tunnels, streams or rivers, and forested areas based on your photo research or actual in person observations. It will also show you where you haven’t allowed enough room for scenery and may need to consider leaving something out.
During this phase of planning also consider the use of terrain and forested areas as a view block to break up your layout. These can greatly increase the perception of your Model Railroad looking larger. In our example, the Main Street buildings, 7, and industries 1, 2, and 3 create a center view block across the layout. The forested areas in the central portion do the same. The large industry 5 and the forested area next to industry 1 help to disguise the unrealistic end loops.
The use of a scale drawing in this aspect can give you a true feel of just how large scenic element will actually be. The grid gives you a quick reference for measurement. Even if fully filled in, the two forested areas on the insides of the loops are only about 6″x12″. Barely enough for ten N Scale sized trees each.
STEP 7: FINAL TWEAKS

Step 7 is the final revision of your scale track plan based on all the steps above. As mentioned above, in the section Putting Your Ideas On Paper, often times by this point, or sometimes even sooner, you come up with a better idea. At the completion of the plan above the idea came to mind to elevate industries 1 and 2 a bit with a layer of 3/4″ foam board. This simple idea led to a retaining wall and two stub end yard tracks, an interesting slope down to industry 5, and the idea of a brick retaining wall behind the Main Street building row.
Also added were two simple arched stone culverts with small water features, and a parallel track next to industry 4 serving a dirt lot team track. These additions add functionality to the track plan, and an interesting vertical feature on an otherwise flat layout.
So that’s it. We have a double-track mainline, two passing sidings on the mainline, a passing siding/arrival track on the inner loop that holds a 15-car train, two yard tracks that hold a total of 20 cars, 6 industrial buildings, and a train station. Not too bad for a 3’x8′ area. The whole process took less than an hour to draw out, and now we have an accurate scale drawing to use when starting the actual building process.
We hope that you’ve realized that drawing a scale track plan for your Model Railroad is not only important, but also not at all difficult to do. Using the techniques above you can quickly and easily draw your plans to scale and save yourself from making mistakes later on in the building process. Below you will find a link to some great track plans that you can use for ideas, and also don’t forget to check out our other articles in the Planning Category.
Copyright 2026 The Model Railroad Benchwork Store/Model Railway Techniques.com All Rights Reserved
Related Articles
MODEL RAILROAD TRACK PLANS
If you have any questions or comments regarding this article drop a comment down below and we’ll respond back to you.
Also, please share and click the subscribe button in the bottom right corner to receive automatic updates of new posts. Your email is confidential and will NOT be shared or redistributed.
James, Model Railway Techniques.com
Last Updated on 2 years ago ago by James from Model Railway Techniques
Amazing article. I am into scaling models and I have seen many of these train track people build on the internet. But I didn’t know what kind of planning something like this needed. To be honest I though it was a much simpler process but I do get that for something like this careful design is imperative. Excellent information for anyone that wants to make something like this.
Thank you, Stratos K, for your comment. We are thrilled you found our article of interest. Unfortunately, with the proliferation of videos on the web these days the actual details tend to get lost. That’s why we are creating quality content to genuinely expand the knowledge of Model Railroaders in every scale. We hope to see you back again.
James, Model Railway Techniques.
I really enjoyed reading your article on designing a track plan for a model railroad. The step-by-step illustrated guide you provided is incredibly helpful and makes the track planning process seem much more manageable. I appreciate that you emphasize the importance of considering various factors such as location, era, types of trains, operational ideas, and scenic elements when designing the track plan. It’s great that you highlight the importance of personalization and encourage readers to design their own track plan rather than relying on generic plans from the internet. Overall, your article provides valuable insights and tips for both beginner and advanced model railroaders.
Can you provide some suggestions for resources or references where readers can find more information and inspiration for designing their own model railroad track plans?
Thank you, Drew. I’m happy you found our article helpful and insightful as well. As far as resources go, we have some small and also medium sized track plans on our site with useful captions and suggestions for each one. There are a ton of track plan images on the web, and if one wants to use those then I suggest our guidelines of modifying them to suit your needs be taken into consideration. There are also programs based on CAD that one can purchase, if you are willing to learn how to use them. Personally, I think drawing them yourself is better for reasons pointe out in the article. I also recommend John Armstrongs book, Track Planning for Realistic Operation, it has a wealth of information in it.
James, Model Railway Techniques.
I have always had a fascination with trains both real and model trains. I had some sets when I was a young kid but I could never set them up like what your article is talking about. I would never think about everything you should consider before setting up a large model train track. I would never have considered the era of my design, freight or passenger, or if I would want a single track or multiple tracks. After reading your article I would be able to make a great plane before starting to build.
Cheers
M.T. Wolf
Thanks for visiting Model Railway Techniques and leaving a comment Mike, we appreciate it. Considering the era, type of operations, and single vs multiple track are key in designing a Model Railroad track plan that will bring you years of enjoyment, and thus the emphasis that was put on these considerations in addition to the step-by-step process of actually drawing a track plan. Often these important steps are missed, and we at Model Railway Techniques want to help beginners and seasoned Model Railroaders alike avid these mistakes.
James, Model Railway Techniques.
Wow, designing a track plan for a model railroad is an incredible experience! It allows you to unleash your creativity and bring your miniature world to life. The process of carefully planning the tracks, structures, and scenery is both exciting and rewarding. It’s like being the master architect of your own miniaturized railway empire. I highly recommend anyone interested in model railroading to dive into track planning – it’s an absolute blast!
Thanks for the comment, Wallace, we really appreciate it. We also hope you found the article well informed with enough information to give you the confidence and knowledge to create your own Model Railroad!
James, Model Railway Techniques.
In my opinion, designing a track plan for a model railroad is a fascinating and creative process that allows you to bring your vision to life. I have always been captivated by the intricate details and realism that can be achieved through careful planning and layout design. When I embarked on designing my own track plan, I found that drawing inspiration from real-life railroad systems and incorporating elements of my own imagination enhanced the overall experience. Reflecting on my experience, I realized that it’s essential to consider factors such as available space, the scale of the model, desired scenery, and operational aspects like train movements and accessibility. It’s also crucial to strike a balance between functionality and aesthetics to ensure an engaging and visually pleasing layout. As I continue to refine my track plan, one question that arises is how to effectively integrate different levels, incorporate realistic curves and gradients, and create a layout that offers variety and operational possibilities. How can I strike a balance between complexity and simplicity to ensure an enjoyable and manageable model railroad experience?
Thanks for the comment Akumendoh, it’s great to see an established Model Railroader reaching out for more ideas and advice on track planning. Integrating different levels by the use of grades for the trackwork itself can be a bit tricky if you don’t have a larger space to work with, say like a 10×10 or 10×12 space. Depending on what scale you’re in, grades can get quite steep. There is a lot of advice out there saying that if your locomotives can pull the train then go as steep as you want. But then the issue of appearance becomes a factor. Sure, maybe your locomotive can manage a grade of 3 or 4 percent, but how does that steep of a grade look compared to the other elements around it? Real railroad grades that steep do exist, but they are barely perceptible in real life because of the real world 1:1 viewing aspect. Only when seen from a great distance can you actually see how far the train tracks climb. For a Model Railroad standpoint of looking right, I would stick to a 2% grade, and allow a minimum of 3″ side clearance for scenery for every 1″ of track elevation. Unless of course you are planning steep rock faces, as is the case on some railroads, but generally avoided if possible. Curves should be as large as possible for best appearance, and if you have to use a sharper radius then the use of an easement entering the curve will really help with appearance. it’s always best, in my opinion, to start with less track, then add more where distance between tracks, elevation changes, and other scenic items will allow them without making the whole layout look too crowded and unrealistic.
James, Model Railway Techniques.
This is an impressive blog article! I didn’t think that building a railroad track for the models would be so intensive. How long does it take to plan versus the set up of the track? Do you recommend an indoor track or have you had success with tracks done in the backyard? I think it would be a fun project for my boys.
Hi Kelly, thank you for visiting Model Railway Techniques. The time it takes to design a Model Railroad can vary depending on the complexity of the design and the elements you want to include. For someone just starting out I would recommend a simple oval with a couple turnouts for some variety. You could have trains running in about a week once you have a suitable place to set it up and can add scenery and buildings over time.
There are outdoor trains, or Garden Railways, but these are in the much larger G Scale and are fairly expensive compared to the indoor types we discuss. The most well-known manufacturer is LGB.
I hope you consider introducing your boys to the hobby, it is a great way to learn a lot of skills and gain artistic talent at the same time. I recommend our article Model Railroading For The Beginner to learn more about the hobby, it truly is great.
James, Model Railway Techniques.